
BluLaser Set Up
BluLaser Set Up
1. Safety
Your BluLaser is a Class 4, 445 nm laser diode, 5 W or 10 W depending on your version. A Class 4 laser can cause permanent eye damage and start fires. Read the laser safe operating procedure before first use, and follow these precautions with common sense and vigilance.
- Only use the 12 V power supply provided with your BluLaser. Connecting the 24 V controller power supply may destroy the laser.
- It is a condition of purchase that the user is competent and will not use the laser for any harmful purpose.
- While power is connected or the laser is operating:
- Have the laser in its mount on the Z axis, pointing down at the waste board.
- Never leave the laser running unattended, not even for a moment.
- Wear the right PPE, including goggles made for blue diode lasers (see above).
- Keep all body parts away from the beam.
- Lock the door of the room, garage or shed so no one without laser PPE can walk in.
- Keep a fire extinguisher within reach of the machine.
- Remove the laser from the Z axis before routing.
Materials and fumes
- Burning material can give off harmful fumes.
- Make sure there is good ventilation, including a fume extractor.
- Don’t laser plastics. Many give off harmful fumes such as chlorine.
- Don’t laser plywood or other materials whose adhesives may become flammable.
- Incorrect power and speed settings can make your material catch fire.
2. Software
LightBurn is design (CAD), toolpath (CAM) and sender software in one, and it is intuitive to use. For a GRBL laser like the BluLaser you need LightBurn Core. Download a free trial or buy a licence from lightburnsoftware.com.
LightBurn and LaserGRBL are the supported programs for the BluLaser. LaserGRBL is free, but it only does toolpaths and sending, so you can’t design in it.
3. What you need
- A BlueCarve CNC
- Your laser connected to the laser (TTL) and GND terminals of your CNC controller
- The 12 V power supply connected to your BluLaser
4. Connect the laser
- With the controller and laser power off, mount the BluLaser on the Z axis with the lens facing down.
- Plug the laser lead into the green 4-pin connector on the controller box, at the terminals labelled Laser + and Laser −: the yellow wire to Laser + and the black wire to Laser −, as shown on the controller label.
- Connect the 12 V power supply to the BluLaser.
5. Set up the BluLaser in LightBurn
- After installing LightBurn, click Devices in the Laser window.

The Devices button is at the bottom of the Laser window. - Click Create Manually.
- Choose GRBL, then click Next.
- On the “How do you want to connect to it?” screen, click Next.
- Name your laser, or leave it as GRBL.
- On the work area screen, enter the dimensions for your machine:
Work area for a Bluey 1×1. Machine X Axis Length Y Axis Length Bluey 1×1 750 mm 750 mm Bluey 1×1.5 750 mm 1250 mm Turbo and Trax (all sizes) Set for your machine (see below) Turbo and Trax: set the work area for your own machine. With the laser mounted, jog it to the furthest points it can reach along X and Y, measure the distance it can travel on each axis, and enter those figures as the X and Y axis lengths.
- Click Next.
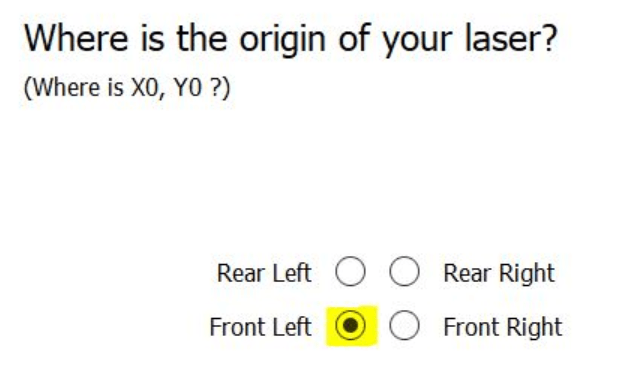
- Choose Front Left as the origin.
Set the origin to Front Left. - For practicality, leave Auto “home” your laser on startup turned off.
Leave auto-home off. - Click Finish.


6. LightBurn settings
Next, change a few settings so the machine behaves the way it does in Easel.
Device settings
Go to Edit > Device Settings.
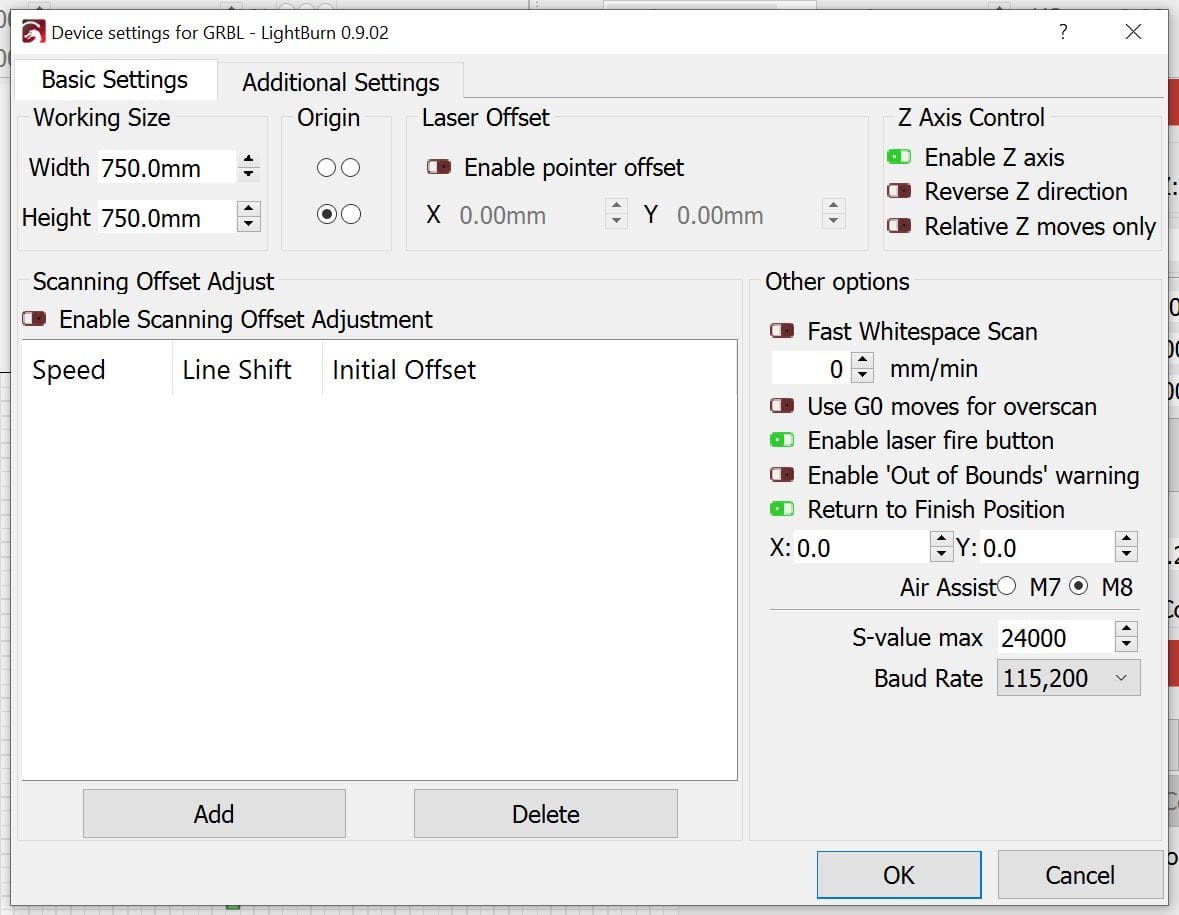
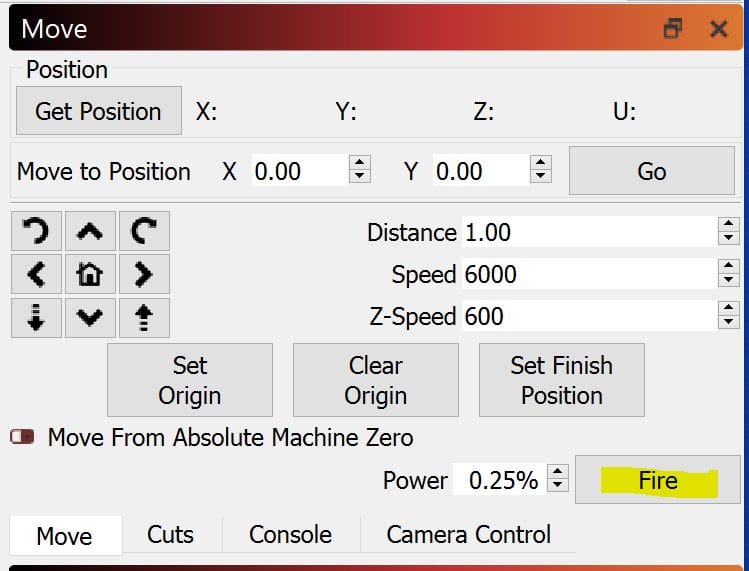
- Turn on Enable laser fire button. This adds a Fire button for positioning and focusing.
- Leave Enable ‘Out of Bounds’ warning turned on. It warns you before a job runs past the edge of the work area.
- Set the other device options, such as Enable Z axis and Return to Finish Position, as described in LightBurn’s own documentation.
- S-value max must match your controller’s maximum spindle/laser power setting (
$30on GRBL). If they don’t match, the laser won’t reach the power you set. Set it to 24000 on every BlueCarve machine.
Restart LightBurn to make the Fire button appear in the Move window.
General settings
Go to Edit > Settings.
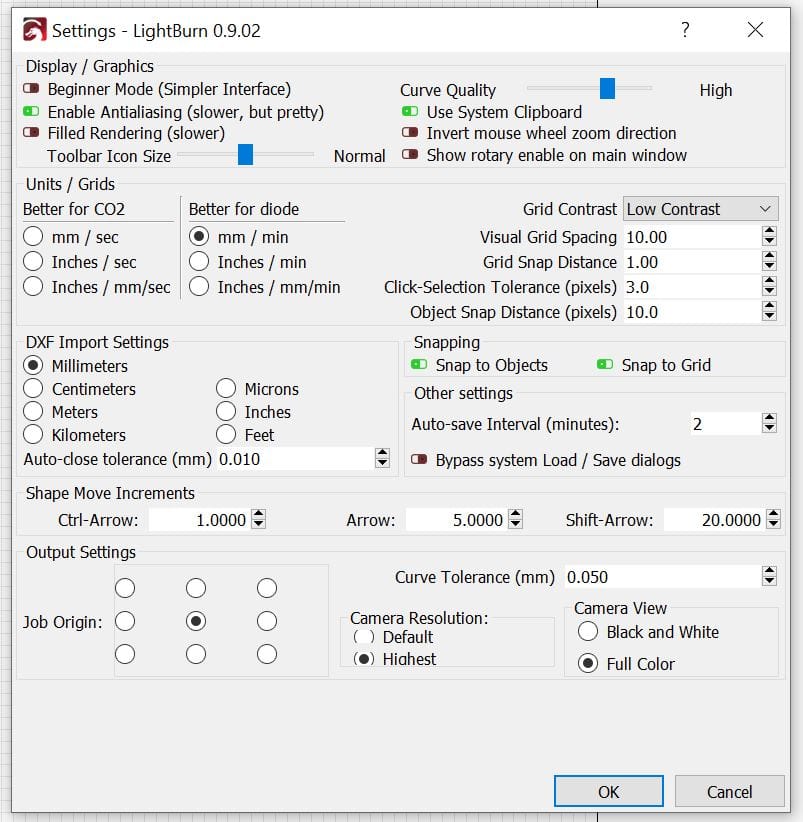
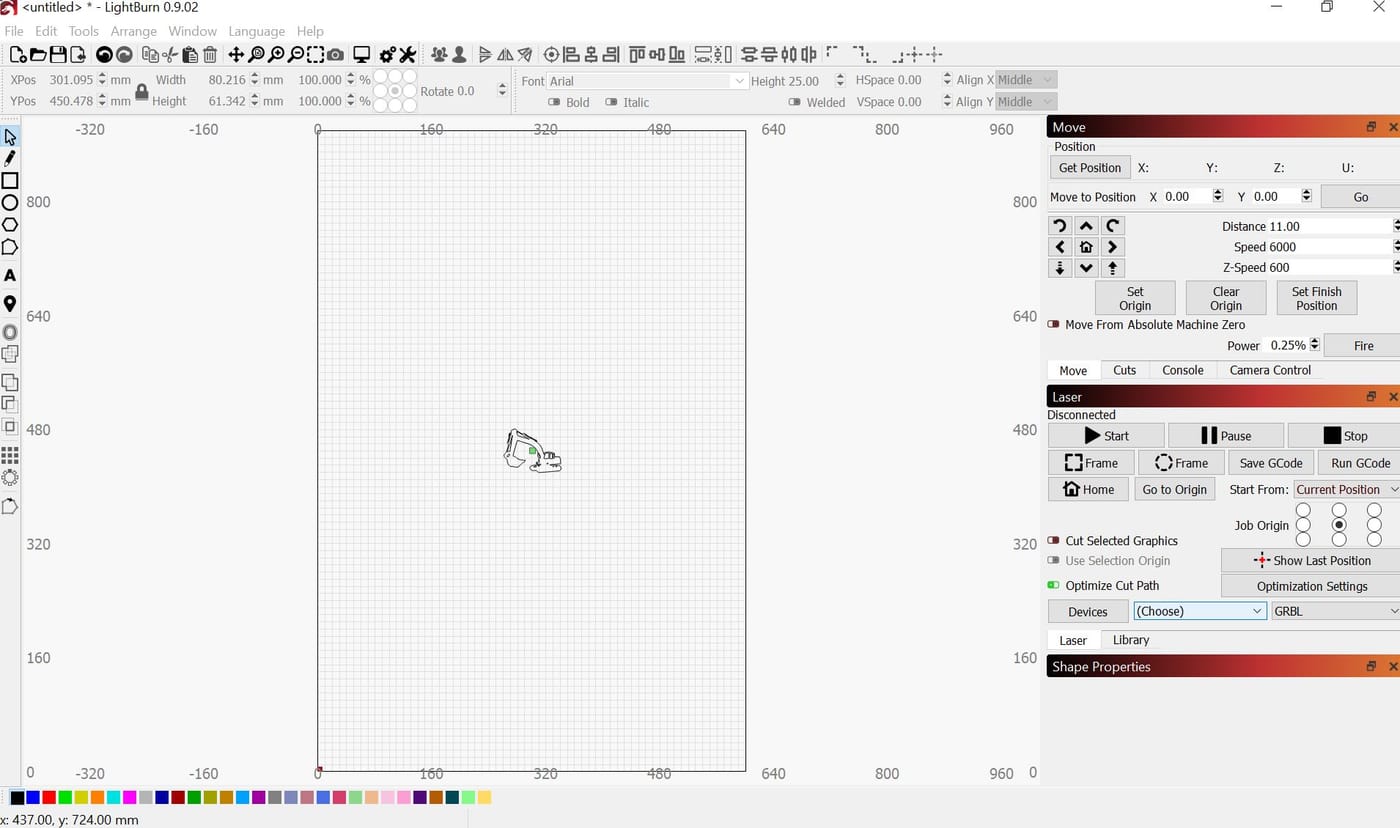
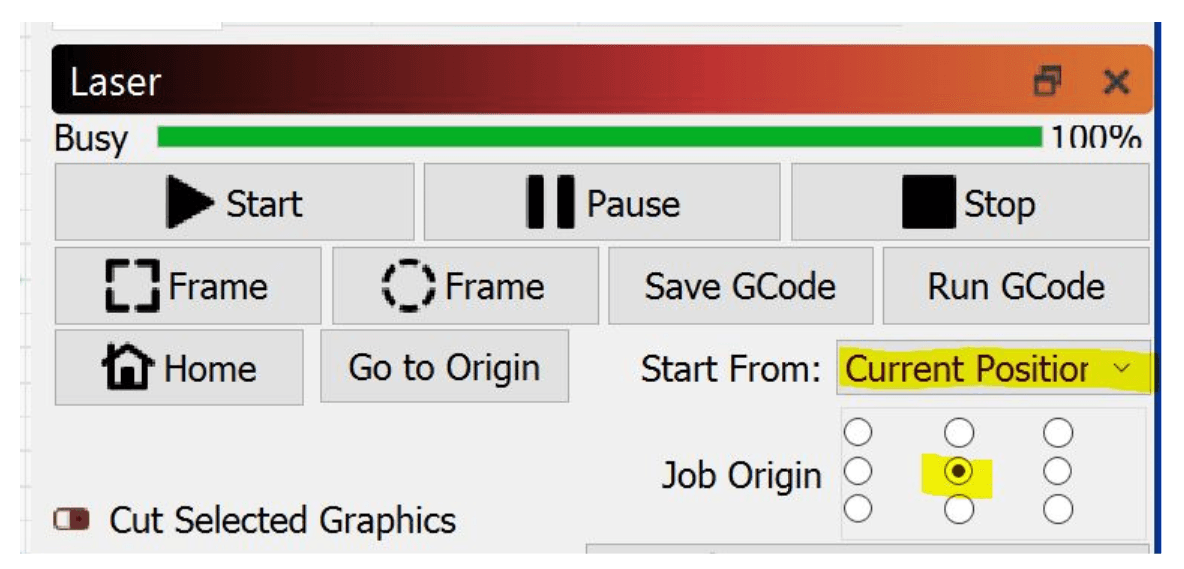
In the Laser window, set Start From to Current Position.
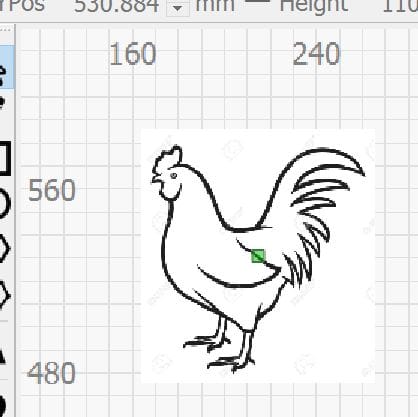
Then choose the Job Origin. This is the point of your design that the laser starts from: wherever you jog the laser to, that point of the design lines up with it. The small green square on your design shows where it is. In the example below it is in the middle of the chicken.
7. Focus your laser
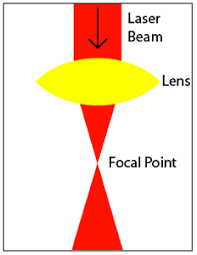
The beam comes out of the lens in a V shape and narrows to a focal point. You need to be within about 1 mm of that point to get the crispest engraving.
- Put on your laser goggles and make sure anyone else in the room has theirs on.
- Make sure the laser is off. If you have already turned on Fire, turn it off.
- Place a piece of anodised metal, or another material that shows a clear dot, under the laser.
- With the laser off, loosen the two M3 screws at the back of the mount, move the module up or down, then tighten the screws again.
- Set the power in the Move window to a low value, then press Fire to test-fire. Look at the size of the dot, then turn Fire off again.
- Repeat steps 4 and 5, always with the laser off while you adjust, until the dot is as small as you can get it (about the size of a full stop).
- Once you have the best focus, measure from the material to a fixed point on your BluLaser. Use this measurement to set the height for future jobs.
8. Troubleshooting
| Problem | Check |
|---|---|
| Laser doesn’t fire bright enough or engraves are fuzzy | Check the focus (see Focus your laser). Check S-value max is set to 24000. |
| No Fire button in the Move window | Turn on “Enable laser fire button” in Device Settings, then restart LightBurn. |
| Laser doesn’t fire at all | Check the 12 V power supply is connected to the laser and the laser lead is in the Laser terminals of the green 4-pin connector. |
| Laser stopped working after being connected to another supply | Only use the supplied 12 V supply. The 24 V controller supply may destroy the laser. Email Adam. |
| Job starts in the wrong place | Check Start From is set to Current Position and check the Job Origin (green square). |
| Material catches fire | Stop the job. Your power and speed settings are wrong for the material. Never leave the laser unattended and keep an extinguisher nearby. |
Email adam@bluecarve.com.au with your machine model, size and a photo or short video of the problem. Owners also help each other in the BlueCarve owners group on Facebook.
Stuck on something? I’m Bingo. Answer a couple of questions and I’ll point you to the fix.