
Spark Plasma Troubleshooting
Spark Plasma Troubleshooting
1. Getting book values or better
“Book values” are the cut speeds and settings published by your plasma cutter’s manufacturer. To reach them, every item below must be at least satisfactory. If any of them slips, your cutting speed and cut quality will drop and you will need to adjust your settings. Fine-tuning your settings will give you the best cut quality and speed.
- Air pressure into the plasma cutter must meet the manufacturer’s specification. For example, Thermacut plasma cutters need 6 bar to pierce and 4.5 bar to cut, measured where the air enters the plasma cutter, not at the compressor outlet.
- Air must be 99.9% pure. Use a suitable air dryer fed from the compressor, followed by an oil filter. AT1000 motor air filters are a good start, but they degrade quickly.
- The water tray is installed and filled with water as high as possible, up to the material.
- Nozzles and electrodes are near new. They wear faster if there is no air dryer or water tray.
- The manufacturer’s pierce height and cut height settings are followed.
2. What controls cut quality
The items above are a great start, but they don’t guarantee a perfect cut. Cut quality also depends on the following.
Plasma settings
| Setting | What it affects |
|---|---|
| Cut speed | Dross |
| Cut height | Taper of the cut edge |
| THC (torch height control) | Keeps the cut height correct while cutting at the cut speed. Start at auto (0) and let the THC set the voltage. Once you are confident, enter the average voltage you have observed as V. |
| Cut speed 2 | Hole formation. The THC does not operate while cut speed 2 is active. This setting is set for a 25.4 mm hole diameter. |
| Pierce height | Material penetration |
Material
- Grade: different grades cut differently. For example, Corten steel does not cut the same as HR250 mild steel.
- Size: thicker and wider material is better. A full sheet of 3 mm or thicker cuts far more pleasantly than a 2 mm offcut.
3. Checklist before you start a cut
Plasma cutter
- Turn the air on, and check the correct pressure is reaching the plasma cutter.
- Connect the earth (ground) clamp to the material, on a clean surface without rust or paint.
- Install the correct consumables. Use fine-cut nozzles on Thermacut units for material 4 mm and thinner. Use finer nozzles for thin material on Unimig machines.
- Set the correct amps on the plasma cutter.
MyPlasm CNC
- Check that the correct parts have been allocated for cutting.
- Set the correct kerf in Import.
- Set the lead-ins and lead-outs as required.
- Check that lead-ins are inside holes and outside shapes.
- Enter or select the settings for the material (see plasma settings above).
- Reference (home) your CNC by clicking XZY.
- Jog the torch to the cut start point, usually the bottom left.
- Lower the torch to within 12 mm of the material using the up/down function (if your computer allows it, use Fn + the up/down keys).
- Set the project position to bottom left.
- Click Z=0 to set the torch height.
- Click the play button to start cutting.
4. Connection and set-up problems
Computer won’t connect to the controller (“Communication Error”)
| When | Cause | Fix |
|---|---|---|
| Not the first time using it | Controller not powered, USB not connected, or faulty USB cable. |
|
| First time using it, Windows 11 only | Any of the causes above, or the driver didn’t install correctly. |
|
All three collision head limit switches are activated (first time using it)
Cause: one of the three limit switches is too far from the bottom plate, even by as little as 0.5 mm. If one switch activates, all three show as activated.
- Loosen one limit switch.
- Turn it clockwise to reduce the gap, until you feel the switch sitting on the bottom plate.
- Repeat for the other two switches.
Right Y motor (YR) isn’t moving in sync with the left (YL)
Cause: the second Y axis motor is not enabled in MyPlasm CNC.
- Open Configuration (the cog, top right).
- On the first tab, Electronics, find Axis func at the bottom left.
- Set it to Inverted Y (In1 Home).

Axis func set to Inverted Y (In1 Home).

Motors run much too fast or too slow
Cause: incorrect configuration settings.
Fix: go to the BlueCarve plasma instructions and load the correct plasma configuration for your machine: helical or straight rack.
5. Torch firing problems
The plasma cutter doesn’t start a pierce (first time using it)
Cause: the plasma interface is not enabled.
- Open Configuration (the cog, top right).
- On the first tab, Electronics, find Plasma Interface at the top right.
- Tick Enabled.
Plasma Interface enabled.

The plasma starts cutting late and doesn’t complete the shape
Cause: the plasma cutter needs a few microseconds to start up, and the Thermacut 40SD needs 2 seconds to start subsequent cuts.
- Open Configuration (the cog, top right).
- On the first tab, Electronics, find Plasma Interface at the middle right.
- Tick Waiting for ARC OK.
Waiting for ARC OK enabled.

The plasma pierces but doesn’t continue cutting
Cause: Mark Start Points is enabled.
Fix: turn off Mark Start Points. The button is at the top of the main screen, to the left of the framing function.

The plasma keeps firing after the cut is finished
Cause: on Unimig plasma cutters, the 4T setting may be selected.
Fix: change to 2T.
6. Torch height problems
| Problem | Cause | Fix |
|---|---|---|
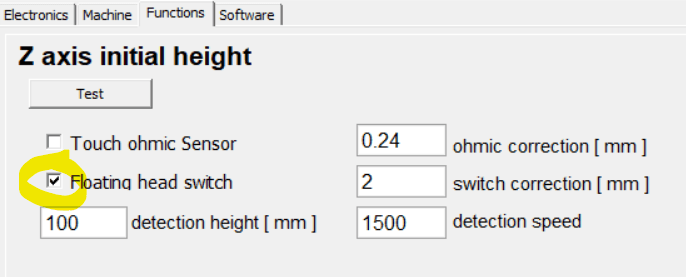
| The plasma is cutting well above the material | Floating head switch not enabled. | Open Configuration (the cog, top right), go to the third tab, Functions, and tick Floating head switch (see the screenshot below). |
| The plasma pierces, then the torch travels up continuously | Cut height set incorrectly, for example 381 mm instead of 3.81 mm. | Check the cut height and pierce height. |
| The plasma pierces, then gradually lifts | The plasma cutter is putting out a higher voltage than needed, so the THC thinks the torch is cutting too low and lifts it. | Reduce the amps on the plasma cutter first. If that’s not enough, increase the feed rate slightly. |
| The plasma pierces, then gradually drops | Cutting speed is too slow, or the THC is set incorrectly. | Use the correct book settings. Increase the feed rate. Reduce the amps. |
| You always get a material detect error | The torch is too far from the material, or the material detect sensors aren’t working. | Lower the torch a further 50 mm. On the configuration page, check that mat detect lights up when you trigger the torch bracket. |
| The plasma pierces and cuts well, then stops suddenly (collision detection activated) | Cutting speed is too slow, or dross is building up on the nozzle and catching on the material. | Remove the dross from the nozzle. If there’s no dross, increase the cutting speed or reduce the amps. |
7. Cut quality problems
| Problem | Cause | Fix |
|---|---|---|
| Too much dross | Incorrect settings, or worn consumables. | Check the book settings. For thinner material, try not to go over 45 A and adjust the feed rate to suit. Don’t go over 5,000 mm/min. Replace both the electrode and the nozzle. |
| Doesn’t cut all the way through, just sparks off the surface | Poor earth, incorrect settings, or bad air supply. | Attach the earth clamp to the material. The feed rate may be too high or the amps too low. Water may have collected in the hoses and be purging during longer cuts. |
| Small circles aren’t cut out cleanly | Amps too high or feed rate too fast. | Reduce cut speed 2 to 60%. Reduce the amps and the feed rate. |
| Three sides cut well and one side is poor | Parts are too close together and not cooling down. | Make sure the water in the water tray is right up to the material. Space the parts further apart. |
| Thin plate (2 mm and below) cuts poorly even with book values | Book values assume the plasma cutter is at maximum amps. On thin plate, the controller’s torch height control struggles to read a consistent voltage, and the material shakes as the machine moves. |
|
8. Shape and lead-in problems
| Problem | Cause | Fix |
|---|---|---|
| The shape was cut with the lead-in on the wrong side | An object inside the shape (even a dot) inverts the lead-in, or the lead-in is set incorrectly. | Check your design for stray objects inside the shape. Check the lead-in settings. |
| Lead-ins are missing even though they are selected | Shapes are not joined (closed) in the file. | Check the file for open shapes. |
| The torch cuts over the same line twice | One shape overlaps another in your design. | Delete the overlapping object. Software such as LightBurn can detect overlapping shapes. |
9. Motion problems
Circles are cut with two flat sides
Cause: slop in the pinion or spring.
- With the controller on, push the axis back and forth by hand.
- If there is slop, check whether the pinion is rotating.
- Check whether the motor pivot moves down too freely.
- Tighten the pivot bolt.
Motors stop intermittently mid-cut
Cause: an obstruction.
Fix: find and clear the obstruction. Check the rails, the rack and the cable chain.
10. Consumables, air and water tray
| Problem | Cause | Fix |
|---|---|---|
| Electrodes and nozzles don’t last long | Moisture in the air system, a lot of piercing, or wrong settings. Unimig and SWS torches are known to wear faster than Thermacut torches. | Purge the air, fit additional filters and look into an air dryer; fit new hoses when you do. Use a worn set of consumables for piercing, then come back with a fresh set for cutting. Look into a Thermacut-compatible torch for your Unimig plasma cutter. |
| The water in the water tray smells | No treatment chemicals in the water. | Add Plasma Protector, or add algaecide until the smell and any spores disappear (this may take a few doses). Mix the algaecide into a bucket of water first, then spread it evenly across the water tray. |
Email adam@bluecarve.com.au with your machine model, size and a photo or short video of the problem. Owners also help each other in the BlueCarve owners group on Facebook.
Stuck on something? I’m Bingo. Answer a couple of questions and I’ll point you to the fix.